Tuesday, June 30, 2015

Free Cut Paper Art Template / Summer Time

Summer is my favorite season!  I love that there are lots of fun activities, I am on summer break, vacationing, hanging at the beach, relaxing with family, connecting at family reunions, lounging and just being lazy. 

What fun things do you like to do in the summer?

I took some of my wonderful free time and designed a fun Summer Time paper cut art for your pleasure! Take time to unwind, get out your craft blade, colorful paper and take your time cutting this summer time paper cut template. I made it legal paper size but you can increase or decrease the design size to meet your needs. If you have time add colored paper to the summer icons to make it even more fun!


Paper cut template


*Updated*
Please remember:
You can download the template for personal use only... and see how well you do with paper cut art! Free templates will be posted on the last Tuesday of each month. 


It is a jpg but you should be able to download by right clicking on the art and copying it to your desktop.

Please comment below on how you liked the template or use hashtag #WCTemplate and @WashingtonCuts on Instagram to show off  your skills!

Tuesday, June 23, 2015

DIY Foldable Photo Light Box with Wooden Planks for Art/Prints

When I opened my shop on Etsy, I had no clue on how to take proper pictures. Like most small business owners it takes a while to learn the best way to take photos for your products.

In the beginning I read a lot of articles, tried different techniques but the best thing I could have done was to make a light box. Most online instructions I found showed me how to make a light box for jewelry or craft items. Since I design and cut paper art I had to tweak my light box to fit my style and my art. 


DIY light box


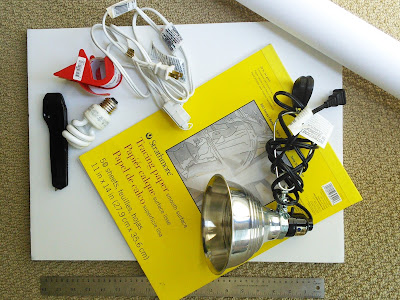
Step One: Gather your items

Items you will need:

  • 2 – 20″ x 30″ Foam Boards
  • 2 sheets of Tracing Paper
  • Box Cutter
  • Metal Ruler
  • Packing Tape
  • Roll of White Craft Paper
  • 2-4 Lamps (clamp style or a bare bulb lamp)
  • 1 CFL light bulb
  • 1 Incandescent light bulb
  • Extension Cord
  • Double Side tape
  • (optional) 3-4 Wooden Planks

DIY Lightbox materials


Set Two: Create your Box

Use your box cutter to cut the foam boards in half - 20" x 15". You will end up with four boards total.

Then create 2 10" x 13" windows, which will be 3 1/2" on the short side and 2 1/2" on the long side.

*(Optional) Create a 2" notch on the short sides to hold your lamps to allow the light to go deeper into the light box.


DIY Lightbox materials


Step Three: Tape it up

Use the double sided tape to affix the tracing paper to the 2 windows. Next use the packing tape to connect the three boards together. Leave a slight gap when taping so you can fold the foam boards over for storage.


Step Four: Set up

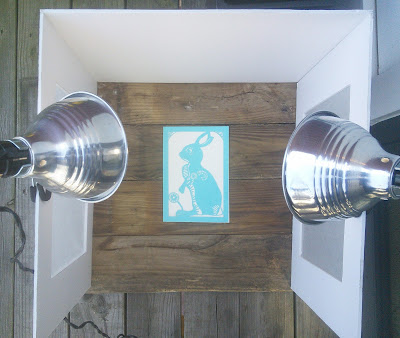
Place your light box if possible close to natural light, like a window and stand your light box on the wood planks. You can clip the lamps on the edges shining in or to the top of the box shining down. This also works outside in natural light, I use my balcony.

You can use the third white foam piece for the top and the fourth for the bottom if you choose. You can then drape the white kraft paper over the back to hide the seam.

Since my art is usually white or is placed on white paper this doesn't work for me. So I use the wood planks to add a natural feel to my paper cut art.


DIY Lightbox materials
With foam board on bottom


DIY Lightbox
With Wooden Planks


Step Five: Have fun!

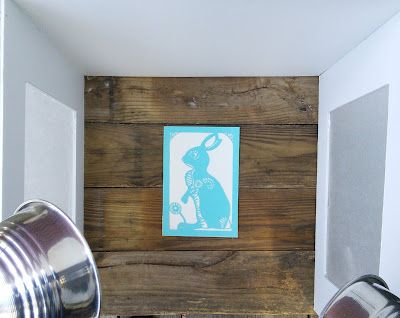
This is where you get to play with your lighting and placement. I like to look straight down into the light box to take my pictures. 


DIY Lightbox
Before

DIY Lightbox
After


You can take a look at my Etsy store to see how I used my light box and wooden planks to enhance my art. 


Tuesday, June 9, 2015

Paper Cut Art- Yoga Poses

My latest paper cut art is inspired from the beautiful poses of yoga. I don't participate in yoga but as an artist the poses are so perfect. Straight lines, feet pointed, arms steady.... Beautiful.

I had to do research on poses, names, and meanings since I don't take yoga classes. On Instagram I follow a group that creates hashtags for people to use to show off their yoga skills. The pictures are wonderful to view. The pictures give the viewer a intimate look into their homes, studios, relationship and lives.

For this paper cut art I sketched a couple of poses I liked. Then I scanned my sketches into Illustrator to clean them up and give them life. I knew I wanted to do a mirror image of the pose displaying the energy and power that the poses create by using shapes are connected to yoga.


paper cut


paper cut


I love how these turned out and I am working on prints, with watercolor added to the art.


Tuesday, June 2, 2015

Inspiration Tuesday- Do it now


I am currently preparing for a craft fair in Philadelphia in two weeks. Participating in art/craft fairs make me nervous. There are too many uncertainties and to sell you have to spend money. Right now my money is "short". 

Since I have a vivid imagination, in my mind I play out that I will sell well and have fun. I have learned over the past, what I see in my mind doesn't always come true.


The first fair I participated in I sold three items... and I felt they were pity sales... My art was well received but the people weren't convinced that they needed my art in their homes. 

I know I need to do these fairs. They will strengthen me as a sales person and as an artist. I will work on my "elevator art" pitch and smile more to strangers.

I also, know selling online (Etsy) in the summer sucks... Sales dry up like a California desert. I have put off doing outdoor fairs for two years saying that I didn't have enough inventory. Well, here I am with inventory and I need to do this now! I going to be brave and try to do at least three fairs this year. Tweaking my finances as I go.

I am brave. You can be too. Go and Do (whatever IT is for you) Now. We are not promised tomorrow and tomorrow may be one day to late.


Inspiration quote